What to have on hand
You don't need to set up suppliers, products or exchange rates first: your account and the shipment's documents are enough. The more documents you upload, the more complete the calculation:
- Commercial invoice: the SKUs come from here, so it is the most important document.
- Packing list: completes the weight and volume of each SKU.
- Freight invoices and insurance policy: add those costs to the shipment.
- Customs broker account: brings handling, fees and other charges.
- [Pedimento](glossary:pedimento): brings the actual taxes. If you don't have it yet, you can work in estimate mode.
1. Create the shipment
In Shipments, press New shipment and fill in the form. Only the Reference is required: use whatever helps you identify it, such as your purchase order or BL number.
- Incoterm: leave it empty to take it from the invoice. See how it affects your costs.
- Transport: sea FCL or LCL, air or land. It is optional.
- Mode: Actual takes the taxes from the pedimento; Estimate calculates them when the pedimento hasn't arrived yet.
- USD → MXN: optional. If you leave it empty, the pedimento's or Banxico's rate is used.
You can change all of this later in Settings, inside the shipment.
2. Upload the documents
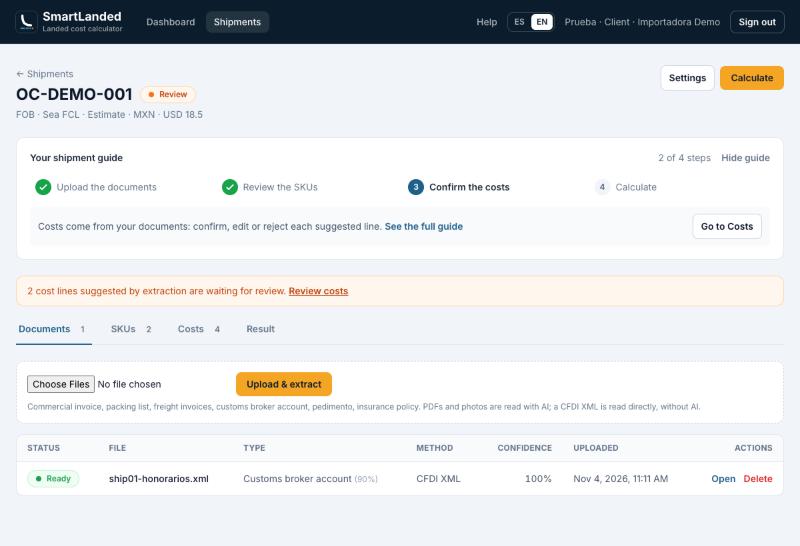
Creating the shipment takes you to the Documents tab. Choose your files (you can select several at once) and press Upload & extract.
Each PDF or photo is classified and read with AI. A CFDI in XML is read directly, without AI. When it finishes you'll see each document's type and status.
If a value came out wrong, open the document: you'll see the original file next to what was extracted, and you can correct it.
3. Review the SKUs
The SKUs tab lists the products from the commercial invoice, with the weight and volume from the packing list. If you didn't upload the invoice, add them with + Add SKU.
- Weight and volume: SKUs missing them are highlighted. Costs allocated by those values will use value instead.
- IGI %: only used in estimate mode. SKUs without a rate are estimated at 0%, so check them.
4. Confirm the costs
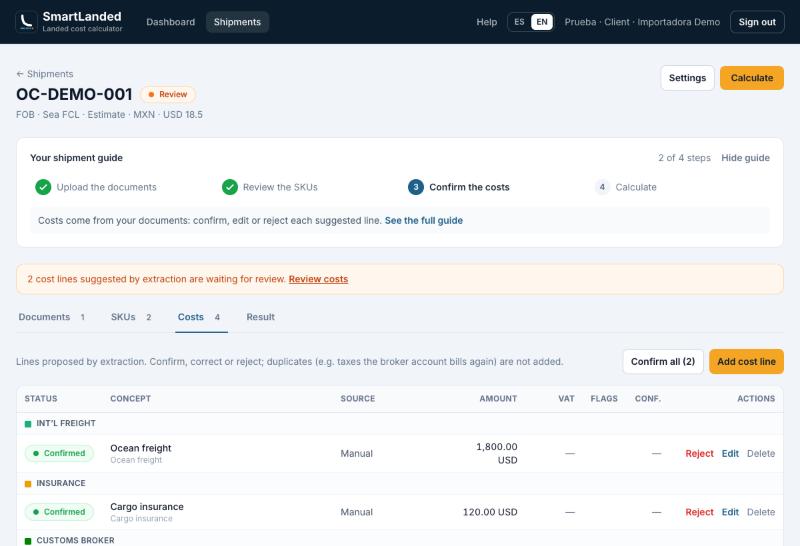
The Costs tab holds the lines suggested from your documents, grouped by cost layer.
- Confirm, correct or reject each line, or use Confirm all once you have reviewed them.
- Duplicates: if a charge appears in two documents (for example, taxes the broker account bills again), it is flagged and not added twice.
- Add cost line: for any expense without a document. Amount and currency are required.
5. Calculate and read the result
Press Calculate at the top right. The button turns on once the shipment has at least one SKU. If any lines are still unconfirmed, they go into the calculation and the result flags them with a warning.
The Result tab shows the totals, a chart of the unit cost by layer and a table per SKU. In actual mode it also compares the estimate with the actual figures.
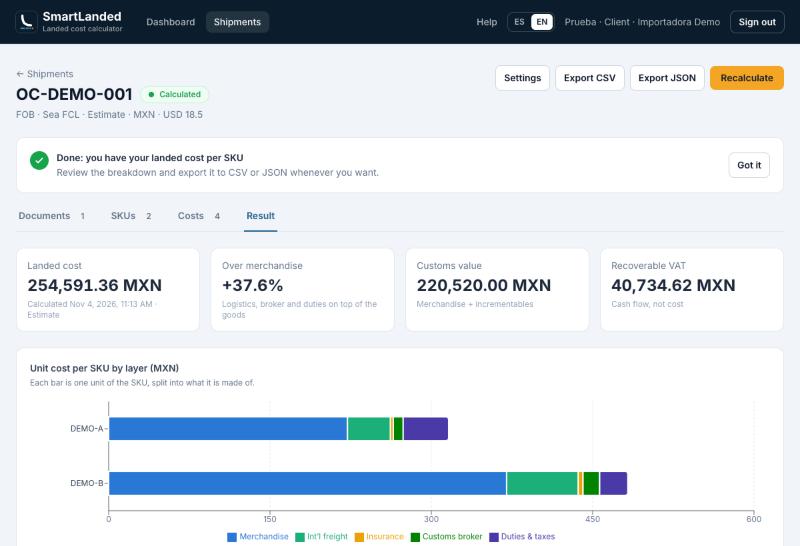
From there you can Export CSV or Export JSON. If you change something later, the app reminds you to press Recalculate. To understand the figures, read how to calculate landed cost.
If you are on the free trial
Keep reading
Guide
How to calculate the landed cost of an import
Step by step: calculate the landed cost of an import into Mexico. Cost layers, customs value, import taxes and per-SKU allocation, with a worked example.
Guide
Allocating import costs by SKU
How to allocate freight, insurance, handling, broker fees and import taxes across products: by weight, value, volume or tariff fraction, with an example.
Guide
Incoterms 2020: which costs each one covers when you import
Which cost layers the seller already pays under EXW, FCA, FAS, FOB, CFR, CPT, CIF, CIP, DAP, DPU and DDP, and what you add to your landed cost in Mexico.
Glossary
Mexico import and foreign trade glossary
Plain definitions for importing into Mexico: pedimento, tariff fraction, customs value, IGI, DTA, PRV, creditable VAT, Incoterms and more.